Open file “Metal Ball”. Select the Elliptical Marquee Tool and make a selection of the ball. Hold shift while dragging to keep the selection a perfect circle. After you’ve selected the ball press Ctrl + C to copy and Ctrl + N to create a new document. Photoshop it’s smart enough to calculate the dimensions of the selection and input those variables into document creation window so all you have to do it’s to press Ok. Paste the image (Ctrl + V).
Step 2
Now we have the ball selected into a new document and the reason for this it is that the door in the middle of the ball kind of ruins the whole aspect of it. We need a nice, round metallic ball and this is the only decent image of a chrome ball I could find, except it has an ugly entrance of some sort that’s ruining its symmetry. Notice that the door it’s mainly in the right half of the image while the left half looks good. The solution to this it is to use the good half to correct the bad one. This technique I am about to use it’s useful when you are retouching or correcting symmetrical objects and it also works great on human faces.
Let’s begin by selecting the Rectangular Marquee Tool and make a selection of the left half of the ball.
Step 3
Click on the ball layer to select it and press Ctrl + J to copy the selection on a new layer. I turned of the visibility of the ball layer temporarily so you can see the half ball layer.
Step 4
While on the half ball layer press Ctrl + T to enter Free Transform. Right-click and choose Flip Horizontally. Hold Shift and drag the half ball to the right to position over the original right half.
Step 5
Add a layer mask to the half ball layer (Layer > Layer Mask > Reveal All) and Alt-click between the half ball and the original ball layer in the Layer palette to clip the upper half ball layer to the lower original ball layer. This means that the half ball layer will be visible only through visible pixels below, so if you did not placed the half of the ball exactly over the right half of the ball in step 4 you don’t need to worry about it now.
Step 6
Selecta soft round Brush Tool at a decent size (100px) an paint with black in the layer mask to hide the areas encircled below.
Step 7
To get rid of the ugly black spot in the middle and to make the ground look right we will repeat the trick from step 2. Let’s make a selection of some ground that looks good on the right side and make press Ctrl + C to make a copy of selected area (before you press Ctrl + C turn off the visibility of the white Background layer an make sure that you have selected the ball layer in the Layer palette). Create a new layer on top of all layers (Layer > New > Layer) and press Ctrl + V to paste it.
Step 8
Now it is only a matter of placing this layer on the right side and using Free Transform and warp to make it fit. Add a layer mask to this layer (Layer > Layer Mask > Reveal All) and using a round soft black brush tool paint over the obvious edges. You should have something like the image below.
Step 9
It starts to look good but there are still a few elements that need correction. First there are some elements that repeat themselves (like the guy in white or the red cordon). Create a new layer (Layer > New > Layer) and use the Clone Stamp tool to remove the indicated spots. There are some additional glitches where the lines in the ground unite but I think the ball it’s looking pretty good as it is so I won’t spend any more time correcting it.
Make sure that you are on the original ball layer and Ctrl-click on it to make a selection. Press Ctrl + Shift + C to Copy Merged (copy all visible pixels, not only the ones on the layer we currently are).
Step 10
Open the image “Apples” and press Ctrl + V to paste it. Name this layer “Metal Apple”. Make sure you save the image so in case your computer crashes your work will be safe.
Step 11
Use Free Transform (Ctrl + T) and warp to fit the ball exactly over the middle apple. Don’t worry about the protruding stem (the little stick that connects the apple to the tree).
Step 12
To make it look more realistic we need some texture from the original apple. Turn off the visibility of the metal ball layer and using the Pen Tool make a selection of the middle apple.
Step 13
Press Ctrl + Shift + C to copy merged and Ctrl + V to paste the selection on a new layer. Because we only need the texture and not the colors desaturate the layer by pressing Ctrl + Shift + U. Change the layer blend mode to Overlay and lower the opacity to 40%. Move this layer on top and clip it to “Metal Ball” layer.
Step 14
Create a new layer above all layers (Ctrl + Shift + N) and clip it to the layer below (the texture layer). Select a round soft brush tool and set it’s Opacity to 40%. Paint gently the edges of the metal ball. Change the layer blend mode to Multiply and further lower the opacity to around 60%. This step will add a bit of shading to the metal ball – I will call it metal apple from now on.
Step 15
To further add some shading and get rid of the flat look of our metal ball let’s add Curves Adjustment Layer above all layers and clip it to the layer below. Drag the curve downwards to darken.
Step 16
Click on the Curves layer mask and press Ctrl + I to invert the colors thus filling the mask with black. Now select a round soft brush and paint again at the edges of the metal apple to give it some 3D look. Take a look at my layer mask below for reference.
Step 17
Now let’s make the little depressed area where the steam connects to the apple. In order to do this click on the background layer (the original one with three apples) and press Ctrl + J to duplicate. Move this layer on top of all layers (a handy shortcut for doing this fast is Ctrl + Shift + ]) and desaturate (Ctrl + Shift + U).
Step 18
Change the blend mode of the layer you duplicated in step 17 to Multiply. Add a layer mask (Layer > Layer Mask > Reveal All) and fill it with black (press D to set default colors and Ctrl + Backspace to fill with Background Color). With a round soft brush at 100% Opacity paint with white in the layer mask to reveal the depressed area.
Step 19
We will need a steam for the apple and I decided to use the one from the left apple. The reason for that is that the steam from the middle apple it’s too short and thin and it won’t look good. So go ahead and make a selection of the stem from the left apple using the Pen Tool or your favorite selection tool (to make a selection with the Pen Tool first create your path than press Ctrl + Enter to transform that path into a selection).
In this tutorial, we’re going to stretch a single line of pixels to create beautiful 3D designs. You can get a glimpse of the design we’re going to make in the preview below:
Step 1 – Getting Started
Go ahead and create a new document (you may want to aim for something above 500x500px just so you have some breathing room for your work). Fill your background layer with a nice blue (#152935), or another color of your choice.
Now, go grab 3 photos that are filled with vibrant colors. I’ve included some pictures you’re welcome to use from here. The actual contents in the picture do not matter, we’re just interested in the color!
You can go ahead and open the photos in Photoshop, we’ll be using them soon.
Step 2 – Fade to Black
Create a new layer.
Using a large (500px), soft (0%), black brush with the Brush Tool, create a large black circle towards the center of your canvas. This will be used to help add depth to our design later on.
Step 3 – Selecting the Pixels
We need to copy a single row of pixels from one of our images. To do this, we’ll use the Single Row Marquee Tool(located underneath the Rectangular Marquee Tool).
In one of your photos, use this tool to select a row of pixels, and then copy (Edit > Copy or Ctrl + C) that row. Paste the copied row into your design in a new layer.
Step 4 – Transform a Row into a Rectangle
Using Transform, vertically stretch this row of pixels into a rectangle that is a bit more manageable in the canvas area. You should also horizontally shrink your pixels so that you have a rectangle of stretched pixels.
Stretching your row of pixels horizontally may be difficult without zooming in since you’ll only have a 1px bounding box to work with. An easier way to adjust this is to simply type in the values (something like 75%) for the transform in theoptions bar.
Step 5 – Duplicate, then Stretch Again
Duplicate this layer of stretched pixels. and then transform your new layer so that it’s quite longer than the original. It should remain the same width.
Step 6 – Creating the 3D Effect
We’re going to apply another transformation to our new layer. This time, it’s a bit more complicated, but I’ll try to make it very simple to follow.
First, align the bottom pixels of your new layer with the top pixels of your first pixel stretch layer.
Go into Free Transform Mode (Ctrl + T).
Grab the top middle handle, and drag it downwards to shrink the layer vertically. The two layers should still meet one another.
Hold Ctrl and click and drag the top middle handle again so that the top of the layer being transformed is offset from the bottom of said layer. The bottom of the layer should still touch the top of the first pixel stretch layer.
Finally, Hold CTRL + Alt + Shift and click and drag one of the top outer handles inwards so they meet in the center. This will give the illusion of a 3D box moving back into space.
Step 7 – Shading
We need to add shading to our new subject. I’d like to have it appear as if it is coming forth out of the dark center of our design. To accomplish this, we’ll be using Photoshop’s Brush Tool some more.
First, we’ll shade the front of our box using a soft, medium size (100-200) brush. Create a selection around the layer contents of your first pixel stretch layer (Ctrl + Click Layer Thumbnail).
Using a Black brush, paint around the edges of the box to give the illusion of lighting in your design.I especially focused my lighting towards the bottom edges of my box to make the light appear as if it came from slightly above.
Try to paint using just the edges of your soft brush so that the shading lightly darkens the box rather painting it completely black.
Now move this layer ABOVE your diagonal pixel stretch layer.
Select the layer contents of your diagonally stretched layer (which is now below your rectangle layer). Expand this selection by one pixel (Select > Modify > Expand).
Using a large, white brush, paint along the bottom of this layer to differentiate between the rectangle layer. Then, using a large, black brush, fade out the back of this layer so it blends into the background.
Step 8 – Repeat
Using different images (or at different parts of the same image even), create several more 3D blocks to create more interesting designs. Here is a combination I put together with the images provided at the beginning of this tutorial:
Vary the angles at which things extrude to give your design greater 3D perspective. You could also try making your blocks extrude from the bottom rather than the top!
Step 9 – Making Colors more Vibrant
After finishing the design shown above, I was not satisfied with the vibrance in the color. To make things brighter, I merged all of my block layers (Select them all in the Layers Pallete, then Layer > Merge Layers), applied a light Gaussian Blur (Filter > Gaussian Blur), and set the layers blending mode to Color Dodge.
Step 10 – Adding Texture
With texture, this design may look much nicer. Check out our Tutorial for adding Texture in Photoshop in just 3 simple steps. After finding a suitable paper texture, I achieved the following results:
Grab the PSD
As always, you’re welcome to grab the Photoshop Document to check out how we put the whole composition together!
Create a Surreal Photo Manipulation of a Monk in the Caves
by BARI on July 8, 2013
Create this surreal scene of a monk and a floating sphere. This tutorial will teach you how to create a cave by transforming and merging different rock parts, easily create ropes in the form of a 3D cube using a 3D cube image as a reference, and creating a mountain scene peaking above the breathtaking clouds.
Create a new photoshop file using the settings indicated in the picture below. I named my file “Surreal Manipulation Tutorial” but that’s up to you.
Step 2: Adding the clouds and the sky
Let’s start off adding the sky to our manipulation. Go to File – > Place, and choose the “Sky2” image, mentioned in the resources of this tutorial.
If everything went well, this is what you should see in your screen:
Now click anywhere in the image, hold the Shift key (so it will translate only in one axis at the time) and drag it a little bit down.
To confirm the changes just hit Enter, or click in that little check sign on the top bar:
Now repeat the process to our second cloud stock (I called it Sky on the resources list). Place the image(File->Place) and drag it down while holding the Shift key again.
This is how your layers panel should be looking like so far:
Let’s add one more image before we start the manipulation. Place the “Field” image (File -> Place) and drag it past the top part of our canvas.
And here’s the four layers we should have so far:
Maybe you don’t have the Background layer, but if you do, you can delete it now because we won’t be using it. Just click it and drag it to the rubbish bin.
Now place the last image we added (the Field) behind our cloud layers. Just click and drag it to the end of our layers panel.
While we’re at it, let’s also rename all the layers so far so we don’t get lost in the manipulation process. Double click the name of a layer to change it.
By the end of this step, this is what your canvas should be looking like:
Step 3: Adjusting the clouds and the sky
It’s looking pretty bad so far, right? But don’t worry, we’ll fix that. Create a layer mask in the “Cloud 2” layer by clicking in the button that looks like a camera on the layers panel.
Create a Surreal Photo Manipulation of a Monk in the Caves
Create this surreal scene of a monk and a floating sphere. This tutorial will teach you how to create a cave by transforming and merging different rock parts, easily create ropes in the form of a 3D cube using a 3D cube image as a reference, and creating a mountain scene peaking above the breathtaking clouds.
Create a new photoshop file using the settings indicated in the picture below. I named my file “Surreal Manipulation Tutorial” but that’s up to you.
Step 2: Adding the clouds and the sky
Let’s start off adding the sky to our manipulation. Go to File – > Place, and choose the “Sky2” image, mentioned in the resources of this tutorial.
If everything went well, this is what you should see in your screen:
Now click anywhere in the image, hold the Shift key (so it will translate only in one axis at the time) and drag it a little bit down.
To confirm the changes just hit Enter, or click in that little check sign on the top bar:
Now repeat the process to our second cloud stock (I called it Sky on the resources list). Place the image(File->Place) and drag it down while holding the Shift key again.
This is how your layers panel should be looking like so far:
Let’s add one more image before we start the manipulation. Place the “Field” image (File -> Place) and drag it past the top part of our canvas.
And here’s the four layers we should have so far:
Maybe you don’t have the Background layer, but if you do, you can delete it now because we won’t be using it. Just click it and drag it to the rubbish bin.
Now place the last image we added (the Field) behind our cloud layers. Just click and drag it to the end of our layers panel.
While we’re at it, let’s also rename all the layers so far so we don’t get lost in the manipulation process. Double click the name of a layer to change it.
By the end of this step, this is what your canvas should be looking like:
Step 3: Adjusting the clouds and the sky
It’s looking pretty bad so far, right? But don’t worry, we’ll fix that. Create a layer mask in the “Cloud 2” layer by clicking in the button that looks like a camera on the layers panel.
Now get the Brush Tool (Shortcut: B), right click anywhere inside the canvas and select a soft round brush (Hardness:0%). Make sure the opacity of your brush is at 100% (just below the Window menu button on the top bar).
Don’t worry about the size of the brush, but remember this shortcuts:
· To increase the size of a brush hit ]
· To decrease the size of a brush hit [
We’re going to be painting with black (to hide unwanted parts of our image non-destructively). To quickly get black as your foreground color just hit “D” on the keyboard.
When painting a layer mask, you can hold Alt/Opt and click it to see exactly what you’ve painted. What you should aim for in this step is to hide the corners of the image, the sky part of the clouds, and blend the clouds of this layer with the clouds of the layer below. To do this last step (the blending of clouds), you can lower the opacity of your brush to something around 10~25%. Here is what my layer mask looks like if I click it while holding Alt/Opt.
And here is the result of this layer mask:
Now we’re going to do the same thing with the other clouds layer (Cloud 1), but this time we are only going to erase the sky part of the layer. So repeat the same steps, create a new layer mask, and paint the sky part with black to hide it.
Here is the result:
Now let’s improve our sky a little bit. Select the Sky layer (from the Field stock), and add a Black & White filter. You can do that by clicking in the circle button in the layers panel:
Now select the Green Filter from the presets and clip this adjustment to the layer below (good photoshop practice). You can do that by clicking in the first button in the Properties window of this adjustment (the button with a square and an arrow next to it). Also, bring the opacity of this layer to 80%, and the Fill to 75%.
The second adjustment we will add to that layer is a Curves adjustment layer. Click in the same button you clicked before, but choose Curves this time.
With the RGB curve selected (default), add two points to it and change its shape to something like mine in the image below. Remember to clip this adjustment to the layer below as well (by clicking in the same button we did before).
Here is the result, and how your layers should look like so far:
To finish our sky, let’s add a layer to correct the lighting of it. Press Ctrl/Cmd+Shift+N and chose the following settings for this new layer:
Now grab the Dodge Tool (Shortcut: O). Make sure the range is set to Midtones, and the Exposure is around 10%.
With the Lighting layer selected, start paining the areas of the sky that should be lighter. To paint the darker areas we need to use the Burn Tool, which can easily be accessed by holding Alt/Opt while you’re painting. This also works the other way around, if you have the Burn Tool selected and hold Alt/Opt you’ll start using the Dodge Tool.
Try to create a good contrast between the dark and light areas, cause that’s what’s going to make this adjustment looks good, don’t be afraid to zoom in in some areas to do some details. Here is what my Lighting layer looks like in normal mode:
And here is the result of it:
Let’s clean our workspace a little bit. Select all the layers we created so far by clicking in the first one, holding Shift, and then clicking on the last one. Then, drag all of them to that little folder in the layers panel, which will create a new group with all of them. You could also select them and use the shortcut Ctrl/Cmd+G. Name this new group Sky/Clouds.
Step 4:Adding the Cave
Before we start creating the cave, let’s paint the area where we want it to be. Create a new layer by clicking in the sixth button in the layers panel, and name it Cave.
Now get the Brush Tool (Shortcut:B), select a soft brush (Hardness 0%), and keep the size around 500px. Now select the black color (Shortcut D) and start painting the contour of the cave around our image. Remember that you don’t have to create a cave exactly like mine, use your creativity!
We are not going to place the image of the cave straight into our canvas, we only need small pieces of the stock image (Little Island) to create our cave, so we’re only going to open it. Go to File -> Open to open the stock in another tab.
Now select the Pen Tool (Shortcut: P) and make a random selection in a random part of the island. Then, right click it and select Make Selection. Leave the Feather Radius at 0px. Here’s one example:
Now hit Ctrl/Cmd+C to copy it, go back to our project, and hit Ctrl/Cmd+V to paste it. Make sure that you’re pasting it above all the other layers.
We’re going to build our cave using these small pieces of the island stock. The first thing you should do after placing a new piece in the project is to drag it to the right place with the Move Tool (Shortcut:V) and create a layer mask for it (we did that a couple of times already).
After that, select the Brush Tool (Shortcut:B), and use black to hide some parts of the piece that you just added. Remember to change the opacity of the brush when painting different parts of this rock, just like that:
Here is the result of the first piece that we added:
We’re going to repeat this process until the cave is complete (I know, it will be a little tedious but bear with me here). So go back to the island stock tab, use the Pen Tool to select another part of it.
Then copy and paste this other piece into our project. If you’re not happy with the piece that you selected, you can try to modify it with the Free Transform Tool. Hit Ctrl/Cmd+T (or go to Edit - > Free Transform) to use the Free Transform Tool. Once you’ve done that, you can use it to rotate, resize or move your image.
· To move the image, just click anywhere inside the rectangle and drag it someplace else
· To rotate the image, click anywhere outside the rectangle and drag it around the image
· To resize the image, click in one of the corners of the rectangle and drag it. To maintain the proportion while doing this, just hold the Shift key during this process.
After some resizing, rotating, and the creation of a layer mask, here’s he result of my second piece of the cave.
Few tips about this process:
· You can use one piece more than one time if you want to, just duplicate it and it will be like a new piece. To duplicate a layer you can: use the shortcut Ctrl/Cmd+J; drag the layer to the sixth button of the layers panel; go to Layer -> Duplicate layer.
· To do the left side of the cave you’ll probably need to flip some of the pieces horizontally. To do that, go to Edit -> Transform -> Flip Horizontal.
· This process will be tedious but if you stick with it the results will make your image unique.
· Try to leave a flat piece of the cave on the right corner so we can add the monk to it later.
· Don’t try to do everything at once, choose a lot of small pieces over a few large ones.
· Put a good song on and have fun with it! =D
In the end here’s how my cave tuned out:
And here is all the layers I used:
To clean that mess we’re going to create a new group with all of them, just like we did before. Select all of them and drag them to the folder button in the layer panels (or hit Ctrl/Cmd+G). Name this new group “Cave Walls” or something, and create a new layer mask to it.
With this mask we’re going to erase some parts of the cave. To do that, use the image below as reference and paint the red areas with black (remember to use a soft brush and keep the opacity around 10~25%).
Here’s how my cave is looking like after that:
As a final adjustment to the cave, add a new layer (CtrlCmd+Shift+N) and let’s do the lighting of it just like we did with the clouds and the sky.
Select the Dodge Tool (Shortcut: O) and try to highlight the areas of the cave that are exposed to the sun, and darken the other areas to create a fade-away effect. Remember to also add some details (highlights close to darken areas) to give a good contrast to it. Here’s how my layer looks like in normal mode:
And here is the result of it:
To finish this step, select the “Cave Walls” group and reduce the opacity to around 85~90%.
Step 5: Adding the monk
Place the monk stock into our image by going to File -> Place. Make sure you place it above all the other layers.
We’re going to select the monk using the Pen Tool. Select it (Shortcut P) and create a path around the monk. Then right click in it and select Make Selection. Usually when you use the pen tool to create a selection you wouldn’t need to add any feather to it, but if you want to add feather don’t go over 1px.
With the monk selected, create a new layer mask to its layer to make everything else disappear.
Hit Ctrl/Cmd+T (or go to Edit -> Free Transform) to resize the monk and place it on the left corner of the cave.
We’re going to use the same technique we’ve been using so far to add lighting to the monk. Hit Ctrl/Cmd+Shift+N to create a new layer with these settings:
Grab the Dodge Tool (Shortcut O) and make sure the range is at Midtones and the Exposure around 25%.
Create the lighting of the monk trying to give the impression that the sun is in front of him. Here’s what I did:
And here is the result:
Create a new layer between the monk layer and the Cave Lighting layer. Name this layer “Monk Shadow”.
Clip this layer to the Cave Walls group by holding Alt/Opt and clicking between the Monk Shadow and the Cave Lighting layer.
Now using a soft brush (Shortcut B), paint the shadow of the monk in the cave using pure black. Don’t worry about going over the sky or the monk because the shadow will only affect the cave layer. Try to do something like this:
To improve the shadow, go to Filter -> Blur -> Gaussian Blur and select a radius of 12px.
Let’s add more shadow above the monk layer. Create a new layer using the same process, name it Monk Shadow again, but this time place it above all the other layers. Also, clip this layer to the Monk Lighting layer.
With the same brush we used before, paint some black in the robes of the monk. Use a soft brush with the opacity set to something around 10~25%.
Here is the final result of this step:
Step 6: Adding the mountains
Place the mountains in our project by going to File -> Place and selecting them.
Add a layer mask to this layer and use black to hide the sky of this image (remember to use a soft brush at least around the peaks of the mountains).
Press Ctrl/Cmd+T (or Edit -> Free Transform) and resize the mountains to make them smaller.
Here is what you should be aiming for:
Now place the mountains between the Cave layer and the Sky/Clouds group.
Select the layer mask of the mountains layer (the one we created before) and keep painting it with black. This time we’re aiming to hide the base of the mountains. Try to give the impression that the clouds are covering some parts of the mountain (set the opacity around 15% when painting these areas).
Rename the mountains layer to “Mountains”(really original huh).
And here is the result of adding the mountains to our scene:
Step 7: Few adjustments
Before we continue, let’s do some adjustments to our workspace. First, select the monk layer and the two layers above it and make a new group with them.
Then open the Sky/Clouds group and drag the Mountains layer inside it. Make sure that it is the top layer inside the group.
Now rename this group to Sky/Clouds/Mountains so we don’t get lost later.
There’s a weird spot close to our cave where the clouds are really white, let’s fix that now. Double click the Cloud 2 layer to make changes to that smart object.
Now select the Clone Stamp Tool (Shortcut S) and follow the instructions on the image below:
· To clone parts of an image hold Alt/Opt and left click in the area you want to use
· To paste the areas you cloned into new areas simply let go of Alt/Opt and left click in the new area
Here is the result:
And here is what our image should be looking like without that weird bright cloud in the corner:
Last but not least, rename the group we created in the beginning of this step to Monk.
Step 8: Adding the planet
Go to File -> Place and select the planet stock.
Now select the Eliptical Marquee Tool (Shortcut M) and create a perfect circle in the planet that it’s on the front. To create a perfect circle simply hold Shift while creating the ellipse.
Then create a new layer mask in this layer to hide everything else but the planet.
Hit Ctrl/Cmd+T (or Edit->Free Transform) to resize and replace the planet in our image.
Now double click the planet layer (double click somewhere around the name of the layer). Add a Inner Glow style to this layer, with the following settings:
Here is the result in our planet:
And this is how your layers panel should be looking like:
Step 9: Adding some ropes
In this step we’re going to add the ropes that will surround our planet in the shape of a 3D cube. Before we start adding the ropes, we need to add the shape of a 3D cube so we can work around it.
Open the 3D cube psd file in photoshop, and select the “spine highlights” group. With this group selected, hit Ctrl/Cmd+Alt/Opt+Shift+E to create a new layer in the file with all the previous layers merged. This is what your layers panel should be looking like:
Now hit Ctrl/Cmd+A to select everything, and then Ctrl/Cmd+C to copy the cube. Go back to our project, and hit Ctrl/Cmd+V to paste the cube that we just copied. You can close the cube psd if you want to, we’re not going to use that anymore.
Make sure the cube layer is right below the layer of the planet.
Press Ctrl+T to go into Free Transform Mode (or Edit -> Free Transform), and use it to resize and move the cube into this position:
Now let’s start adding the ropes. Go to File -> Place and add the rope stock into our project.
Don’t worry about the order of the layers now. Just drag the rope layer 4 times into the Create New Layer button to make 4 copies of it. (or use the shortcut Ctrl/Cmd+J 4 times).
After that, we’re going to place one of the rope layers above the Planet layer, and the three others below it, like this:
Select the second rope layer (the one right below the planet layer) and let’s use it to start our manipulation. Hit Ctrl/Cmd+T (Edit-> Free Transform) and use the Free Transform Tool to resize, move and rotate the rope. The aim of this process is to try to create a cube made of ropes, so each rope will go into one corner of the cube. We’re going to do the top and the bottom part of the cube later, so start by adjusting the first rope to the right corner of the cube.
Do the same thing for the next rope, use the Free Transform Tool again, but this time match the rope with the left side of the cube.
The third and last rope layer below the planet will go on the corner behind the planet, so before you start using the Free Transform Tool, click on the eye on the left side of the planet layer to hide it.
Now select the rope above the planet layer and match it to the corner in the front using the Free Transform Tool.
And this is what your scene should be looking like right now:
The best thing about working with Smart Objects is that even though we just resized all these rope layers, we can still resize them back to their original size without loosing quality of the image, so we’re going to use that in our advantage now. Instead of placing the rope stock again in our image, select the first rope layer (above the planet layer) and make 4 more copies of it (Ctrl/Cmd+J, or drag them to the New Layer button).
Select the four new ropes we just created (click on the first one, hold shift and click on the last one) and drag them below our planet layer, like this:
Now we’re going to repeat the exact same process we used to match the ropes to the corners of the cube before, but this time it will be easier because the rope will be smaller already. So just start selecting each rope layer and chose one of the corners of the bottom of the cube to match it with. Here’s how I did mine:
Remember to hide the planet again to do the corners in the back.
And here is the result:
Now we’re going to do the same thing we did before one last time, to build the top part of our cube. Select the first rope layer and make 4 copies of it (Ctrl/Cmd+J or drag it to the New Layer button).
And use the Free Transform Tool again to build the top and last part of our cube.
Now we have a lot of layers and our project is all messy, but don’t worry, we’ll fix that.
Select all the ropes above the planet layer (Click on the first one, hold Shift and then click on the last one) and drag them to the New Group button (or Ctrl/Cmd+G) to create a new group with them. Name this new group “Ropes in front”.
Do the same thing for the ropes below the planet, but this time name this group “Ropes in the back”.
You can also delete the 3d cube stock we used to build our rope cube because we won’t be needing it anymore. Just click on its layer and drag it to the trash can on the layers panel.
By the end of this step, here’s how your image should be looking like:
And this is how your layers panel should be looking like:
Step 10: Adding more ropes
Ok, so in this step we’re going to continue adding ropes to our project (it will be the last time I promiss). Go to File -> Place and select the rope stock again.
Make 4 copies of this rope layer (Ctrl/Cmd+J or drag it to the New Layer button).
Select all of this ropes by clicking on the first one, holding Shift and clicking on the last one, and create a new group with them (Shortcut: Ctrl/Cmd+G).
Name this new group “Ropes holding the cube” and place it between the Cave layer and the Sky/Clouds/Mountains group.
Open the group that we just created by clicking on the arrow next to it. Then click on the first layer of the group and use the Free Transform Tool (Ctrl/Cmd+T or Edit->Free Transform) to resize, move and rotate the rope.
You don’t have to create a design just like mine if you don’t want to, you can use your imagination. But if you want to put the ropes in the exact same places I did, here’s my step-by-step:
And here’s how my scene turned out in the end:
And how my layers panel is right now:
Step 11: Adding the knots
Let’s put some details into our ropes. Go to File->Place and select the knot stock.
Now get the Quick Selection Tool (Shortcut:W) and try to make a selection around the knot only. Don’t worry if the selection is not perfect, it doesn’t need to be, you can fix it later. Here are some pointers on the Quick Selection Tool:
· Click somewhere in the image to add to the selction
· Hold Alt/Opt and click somewhere in the image to deselect that area
After you made the selection, create a new Layer Mask to that layer by clicking on the third button of the layers panel:
With the knot selected, use the Free Transform Tool Again (Ctrl/Cmd+T or Edit-> Free Transform) to move, resize and rotate the knot to one of the corners of the cube:
Here’s how it looks from distance:
Now repeat that process that we’re used with, make 6 copies of this know layer (one for each visible corner of the cube) by dragging this layer to the New Layer button or by pressing Ctrl/Cmd+J six times.
Using the Free Transform Tool (Ctrl/Cmd+T or Edit-> Free Transform) on each of these knot layers, resize, move and rotate them into each corner of the cube, like we’re used to do.
After that, create a new group with all of these knots (holding Shift to select them all and dragging them to the New Group button or by hitting Ctrl/Cmd+G), and name this group Knots.
And we’re done with this step! This is what your image should be looking like right now:
Step 12: More adjustments to the ropes
Let’s add some adjustments to all the ropes that we created. First, click on the Knots group and drag it to the “Ropes in front” group. Just make sure that the knots group stays on the top of the “Ropes in front” group.
Now let’s add a Curves adjustment layer. Click on the “Create a new fill or adjustment layer” button on the layers panel and select Curves.
Make sure that the curves adjustment layer is above the “Ropes in front” group.
Now remember to clip this adjustment to the group below by clicking on the first button of the Curves properties panel, and then adjust the RGB curve of our adjustment to something like this:
And this is the result:
Now we’re going to copy it two more times like we always do. Select it and drag it to the New Layer buton (or hit Ctrl/Cmd+J).
Take a look at the image below and drag each of these adjustments above one of the other two ropes group.
Remember to click each one of them to the group below by holding Alt/Opt and clicking on the line between the adjustment and the group below.
This is the result we were hoping for:
Step 13: Cleaning our project
We’re entering the final stage of our project now but our layers are sill a little messy, let’s try to clean them now.
Select the first Curves adjustment layer and the “Ropes in front” group and create a new group with them (Shortcut: Ctrl/Cmd+G). Name this new group “Ropes”.
Now select the second Curves adjustment layer and the “Ropes in the back” group and make a new group with them the same way we just did (Shortcut Ctrl/Cmd+G). Name this group “Ropes” again.
Again, select the last Curves Adjustment Layer and the “Ropes holding the cube” group and create a third group named “Ropes”. (Shortcut: Ctrl/Cmd+G)
Now select the Monk Shadow layer, the Cave Lighting, the Cave Walls group and the Cave layer and create another group with all of them. (Shortcut Ctrl/Cmd+G). Name this group “Cave/Monk Shadow”.
And as expected, our image should still be like this:
With the brush tool (Shortcut: B) selected, set the size of the brush to around 300px, the mode to Normal and reduce the opacity to something around 50%. Also, make sure you have black as your foreground color (Shortcut to reset the colors of your palete: D).
Now paint the area inside the cube, the spaces between the ropes holding the cube, and part of the cave in that space as well. Here’s how my layer looked like in normal view:
And here’s the result of it:
Now create a new layer the same way we did before, click on the Create New Layer button (Shortcut: Ctrl/Cmd+Shift+N), reduce the opacity to 8%, change the blending mode to Color, name it Purple, and place it right above the Black layer we just created.
Now, as you guessed, we’re going to use purple to paint our scene. I used #8400ff but you can use something similar if you want to.
Using the same brush settings as before, take a look at the image below and paint our cube with purple:
Here’s the result:
Step 15: Final Adjustments
Ok, this is the last step of our manipulation. We’ll add a bunch of adjustments to change the colors of our image and give it a dreamy look in the end.
First create a Black & White adjustment layer:
And on the properties panel, select the “High Contrast Red Filter” preset.
Then change the opacity of this layer to 27% and this should be the result:
Create a new layer by clicking on the Create New Layer button (Ctrl/Cmd+Shift+N) and name this layer Gradient. Set the blending mode to Soft Light and the opacity to 35%.
Now get the Gradient Tool (Shortcut G) and go to the Gradient Editor.
On the Gradient Editor window, create a new gradient going from a blue color to a yellow color. Try to use colors that are similar to these:
With the gradient we just created, follow the image below to create a gradient in our image. Remember that you won’t see the gradient like in the image below, but I just wanted to show you what it looks like in Normal view.
This is the result of the gradient:
Now add a Brightness/Contrast adjustment above all the other layers and set the Brightness to 20.
This is the result:
Add a Selective Color adjustment layer so we can adjust all the colors of our image at once. On the properties panel, use the following settings in each of the Colors:
The result should be something like this:
Let’s create a new layer with all of our previous layers merged. To do that, hit Ctrl/Cmd+Alt/Opt+Shift+E. Set the blending mode of this layer to Screen, and reduce the opacity to 15%.
Now with this layer selected, go to Filter->Blur->Gaussian Blur and select a Radius of 80px.
The result should be this dreamy effect:
Duplicate the layer we just created by dragging it to the Create New Layer button or by pressing Ctrl/Cmd+J. Set the blending mode of this new layer to Soft Light and set the opacity to 25%.
Here’s the result:
Now create a new layer by pressing the Create New Layer button (or Ctrl/Cmd+Shift+N) and name it Vignette. Place it above all the other layers.
Press D to make sure that black is your foreground color, and then hit Alt/Opt+Del to fill your whole screen with black.
Get the Eraser Tool (Shortcut E), set the size to 2000px, and start erasing the center of our image to create a nice vignette effect to it.
Here’s how your layers should be looking like:
Create a new layer again (Ctrl/Cmd+Shift+N), name it Lens Flare, set the blending mode to Screen and make sure that it is on the top of the layer stack.
Now go to Filter -> Render -> Lens Flare and try to create something like shown on the image below. Remember to select Movie Prime and set the Brightness to 100%.
This should be the result:
Now add a layer mask to that image and hide some of the Lens Flare using the Brush Tool (Shortcut B) with black.
This is the result:
Now for the textures, go to File -> Place and chose Texture 1. Set the blending mode to Overlay and the Opacity to 25%.
This is the result we get:
And for the second and final texture, go again to File -> Place and chose Texture 2. Rotate it (just like when using the Free Transform Tool) and resize it to fit our whole canvas.
Then change the blending mode of this layer to Soft Light and reduce the opacity to 20%.
And this is our final result, and the end of our image:
Remember to select all the adjustments we just added (holding Shift) and create a new group with them. Name this group “Final Adjustments” and we’re done!
Final Results
Download the PSD
Surreal Manipulation Tutorial.zip | 106 MB
About the Author
Now get the Brush Tool (Shortcut: B), right click anywhere inside the canvas and select a soft round brush (Hardness:0%). Make sure the opacity of your brush is at 100% (just below the Window menu button on the top bar).
Don’t worry about the size of the brush, but remember this shortcuts:
· To increase the size of a brush hit ]
· To decrease the size of a brush hit [
We’re going to be painting with black (to hide unwanted parts of our image non-destructively). To quickly get black as your foreground color just hit “D” on the keyboard.
When painting a layer mask, you can hold Alt/Opt and click it to see exactly what you’ve painted. What you should aim for in this step is to hide the corners of the image, the sky part of the clouds, and blend the clouds of this layer with the clouds of the layer below. To do this last step (the blending of clouds), you can lower the opacity of your brush to something around 10~25%. Here is what my layer mask looks like if I click it while holding Alt/Opt.
And here is the result of this layer mask:
Now we’re going to do the same thing with the other clouds layer (Cloud 1), but this time we are only going to erase the sky part of the layer. So repeat the same steps, create a new layer mask, and paint the sky part with black to hide it.
Here is the result:
Now let’s improve our sky a little bit. Select the Sky layer (from the Field stock), and add a Black & White filter. You can do that by clicking in the circle button in the layers panel:
Now select the Green Filter from the presets and clip this adjustment to the layer below (good photoshop practice). You can do that by clicking in the first button in the Properties window of this adjustment (the button with a square and an arrow next to it). Also, bring the opacity of this layer to 80%, and the Fill to 75%.
The second adjustment we will add to that layer is a Curves adjustment layer. Click in the same button you clicked before, but choose Curves this time.
With the RGB curve selected (default), add two points to it and change its shape to something like mine in the image below. Remember to clip this adjustment to the layer below as well (by clicking in the same button we did before).
Here is the result, and how your layers should look like so far:
To finish our sky, let’s add a layer to correct the lighting of it. Press Ctrl/Cmd+Shift+N and chose the following settings for this new layer:
Now grab the Dodge Tool (Shortcut: O). Make sure the range is set to Midtones, and the Exposure is around 10%.
With the Lighting layer selected, start paining the areas of the sky that should be lighter. To paint the darker areas we need to use the Burn Tool, which can easily be accessed by holding Alt/Opt while you’re painting. This also works the other way around, if you have the Burn Tool selected and hold Alt/Opt you’ll start using the Dodge Tool.
Try to create a good contrast between the dark and light areas, cause that’s what’s going to make this adjustment looks good, don’t be afraid to zoom in in some areas to do some details. Here is what my Lighting layer looks like in normal mode:
And here is the result of it:
Let’s clean our workspace a little bit. Select all the layers we created so far by clicking in the first one, holding Shift, and then clicking on the last one. Then, drag all of them to that little folder in the layers panel, which will create a new group with all of them. You could also select them and use the shortcut Ctrl/Cmd+G. Name this new group Sky/Clouds.
Step 4:Adding the Cave
Before we start creating the cave, let’s paint the area where we want it to be. Create a new layer by clicking in the sixth button in the layers panel, and name it Cave.
Now get the Brush Tool (Shortcut:B), select a soft brush (Hardness 0%), and keep the size around 500px. Now select the black color (Shortcut D) and start painting the contour of the cave around our image. Remember that you don’t have to create a cave exactly like mine, use your creativity!
We are not going to place the image of the cave straight into our canvas, we only need small pieces of the stock image (Little Island) to create our cave, so we’re only going to open it. Go to File -> Open to open the stock in another tab.
Now select the Pen Tool (Shortcut: P) and make a random selection in a random part of the island. Then, right click it and select Make Selection. Leave the Feather Radius at 0px. Here’s one example:
Now hit Ctrl/Cmd+C to copy it, go back to our project, and hit Ctrl/Cmd+V to paste it. Make sure that you’re pasting it above all the other layers.
We’re going to build our cave using these small pieces of the island stock. The first thing you should do after placing a new piece in the project is to drag it to the right place with the Move Tool (Shortcut:V) and create a layer mask for it (we did that a couple of times already).
After that, select the Brush Tool (Shortcut:B), and use black to hide some parts of the piece that you just added. Remember to change the opacity of the brush when painting different parts of this rock, just like that:
Here is the result of the first piece that we added:
We’re going to repeat this process until the cave is complete (I know, it will be a little tedious but bear with me here). So go back to the island stock tab, use the Pen Tool to select another part of it.
Then copy and paste this other piece into our project. If you’re not happy with the piece that you selected, you can try to modify it with the Free Transform Tool. Hit Ctrl/Cmd+T (or go to Edit - > Free Transform) to use the Free Transform Tool. Once you’ve done that, you can use it to rotate, resize or move your image.
· To move the image, just click anywhere inside the rectangle and drag it someplace else
· To rotate the image, click anywhere outside the rectangle and drag it around the image
· To resize the image, click in one of the corners of the rectangle and drag it. To maintain the proportion while doing this, just hold the Shift key during this process.
After some resizing, rotating, and the creation of a layer mask, here’s he result of my second piece of the cave.
Few tips about this process:
· You can use one piece more than one time if you want to, just duplicate it and it will be like a new piece. To duplicate a layer you can: use the shortcut Ctrl/Cmd+J; drag the layer to the sixth button of the layers panel; go to Layer -> Duplicate layer.
· To do the left side of the cave you’ll probably need to flip some of the pieces horizontally. To do that, go to Edit -> Transform -> Flip Horizontal.
· This process will be tedious but if you stick with it the results will make your image unique.
· Try to leave a flat piece of the cave on the right corner so we can add the monk to it later.
· Don’t try to do everything at once, choose a lot of small pieces over a few large ones.
· Put a good song on and have fun with it! =D
In the end here’s how my cave tuned out:
And here is all the layers I used:
To clean that mess we’re going to create a new group with all of them, just like we did before. Select all of them and drag them to the folder button in the layer panels (or hit Ctrl/Cmd+G). Name this new group “Cave Walls” or something, and create a new layer mask to it.
With this mask we’re going to erase some parts of the cave. To do that, use the image below as reference and paint the red areas with black (remember to use a soft brush and keep the opacity around 10~25%).
Here’s how my cave is looking like after that:
As a final adjustment to the cave, add a new layer (CtrlCmd+Shift+N) and let’s do the lighting of it just like we did with the clouds and the sky.
Select the Dodge Tool (Shortcut: O) and try to highlight the areas of the cave that are exposed to the sun, and darken the other areas to create a fade-away effect. Remember to also add some details (highlights close to darken areas) to give a good contrast to it. Here’s how my layer looks like in normal mode:
And here is the result of it:
To finish this step, select the “Cave Walls” group and reduce the opacity to around 85~90%.
Step 5: Adding the monk
Place the monk stock into our image by going to File -> Place. Make sure you place it above all the other layers.
We’re going to select the monk using the Pen Tool. Select it (Shortcut P) and create a path around the monk. Then right click in it and select Make Selection. Usually when you use the pen tool to create a selection you wouldn’t need to add any feather to it, but if you want to add feather don’t go over 1px.
With the monk selected, create a new layer mask to its layer to make everything else disappear.
Hit Ctrl/Cmd+T (or go to Edit -> Free Transform) to resize the monk and place it on the left corner of the cave.
We’re going to use the same technique we’ve been using so far to add lighting to the monk. Hit Ctrl/Cmd+Shift+N to create a new layer with these settings:
Grab the Dodge Tool (Shortcut O) and make sure the range is at Midtones and the Exposure around 25%.
Create the lighting of the monk trying to give the impression that the sun is in front of him. Here’s what I did:
And here is the result:
Create a new layer between the monk layer and the Cave Lighting layer. Name this layer “Monk Shadow”.
Clip this layer to the Cave Walls group by holding Alt/Opt and clicking between the Monk Shadow and the Cave Lighting layer.
Now using a soft brush (Shortcut B), paint the shadow of the monk in the cave using pure black. Don’t worry about going over the sky or the monk because the shadow will only affect the cave layer. Try to do something like this:
To improve the shadow, go to Filter -> Blur -> Gaussian Blur and select a radius of 12px.
Let’s add more shadow above the monk layer. Create a new layer using the same process, name it Monk Shadow again, but this time place it above all the other layers. Also, clip this layer to the Monk Lighting layer.
With the same brush we used before, paint some black in the robes of the monk. Use a soft brush with the opacity set to something around 10~25%.
Here is the final result of this step:
Step 6: Adding the mountains
Place the mountains in our project by going to File -> Place and selecting them.
Add a layer mask to this layer and use black to hide the sky of this image (remember to use a soft brush at least around the peaks of the mountains).
Press Ctrl/Cmd+T (or Edit -> Free Transform) and resize the mountains to make them smaller.
Here is what you should be aiming for:
Now place the mountains between the Cave layer and the Sky/Clouds group.
Select the layer mask of the mountains layer (the one we created before) and keep painting it with black. This time we’re aiming to hide the base of the mountains. Try to give the impression that the clouds are covering some parts of the mountain (set the opacity around 15% when painting these areas).
Rename the mountains layer to “Mountains”(really original huh).
And here is the result of adding the mountains to our scene:
Step 7: Few adjustments
Before we continue, let’s do some adjustments to our workspace. First, select the monk layer and the two layers above it and make a new group with them.
Then open the Sky/Clouds group and drag the Mountains layer inside it. Make sure that it is the top layer inside the group.
Now rename this group to Sky/Clouds/Mountains so we don’t get lost later.
There’s a weird spot close to our cave where the clouds are really white, let’s fix that now. Double click the Cloud 2 layer to make changes to that smart object.
Now select the Clone Stamp Tool (Shortcut S) and follow the instructions on the image below:
· To clone parts of an image hold Alt/Opt and left click in the area you want to use
· To paste the areas you cloned into new areas simply let go of Alt/Opt and left click in the new area
Here is the result:
And here is what our image should be looking like without that weird bright cloud in the corner:
Last but not least, rename the group we created in the beginning of this step to Monk.
Step 8: Adding the planet
Go to File -> Place and select the planet stock.
Now select the Eliptical Marquee Tool (Shortcut M) and create a perfect circle in the planet that it’s on the front. To create a perfect circle simply hold Shift while creating the ellipse.
Then create a new layer mask in this layer to hide everything else but the planet.
Hit Ctrl/Cmd+T (or Edit->Free Transform) to resize and replace the planet in our image.
Now double click the planet layer (double click somewhere around the name of the layer). Add a Inner Glow style to this layer, with the following settings:
Here is the result in our planet:
And this is how your layers panel should be looking like:
Step 9: Adding some ropes
In this step we’re going to add the ropes that will surround our planet in the shape of a 3D cube. Before we start adding the ropes, we need to add the shape of a 3D cube so we can work around it.
Open the 3D cube psd file in photoshop, and select the “spine highlights” group. With this group selected, hit Ctrl/Cmd+Alt/Opt+Shift+E to create a new layer in the file with all the previous layers merged. This is what your layers panel should be looking like:
Now hit Ctrl/Cmd+A to select everything, and then Ctrl/Cmd+C to copy the cube. Go back to our project, and hit Ctrl/Cmd+V to paste the cube that we just copied. You can close the cube psd if you want to, we’re not going to use that anymore.
Make sure the cube layer is right below the layer of the planet.
Press Ctrl+T to go into Free Transform Mode (or Edit -> Free Transform), and use it to resize and move the cube into this position:
Now let’s start adding the ropes. Go to File -> Place and add the rope stock into our project.
Don’t worry about the order of the layers now. Just drag the rope layer 4 times into the Create New Layer button to make 4 copies of it. (or use the shortcut Ctrl/Cmd+J 4 times).
After that, we’re going to place one of the rope layers above the Planet layer, and the three others below it, like this:
Select the second rope layer (the one right below the planet layer) and let’s use it to start our manipulation. Hit Ctrl/Cmd+T (Edit-> Free Transform) and use the Free Transform Tool to resize, move and rotate the rope. The aim of this process is to try to create a cube made of ropes, so each rope will go into one corner of the cube. We’re going to do the top and the bottom part of the cube later, so start by adjusting the first rope to the right corner of the cube.
Do the same thing for the next rope, use the Free Transform Tool again, but this time match the rope with the left side of the cube.
The third and last rope layer below the planet will go on the corner behind the planet, so before you start using the Free Transform Tool, click on the eye on the left side of the planet layer to hide it.
Now select the rope above the planet layer and match it to the corner in the front using the Free Transform Tool.
And this is what your scene should be looking like right now:
The best thing about working with Smart Objects is that even though we just resized all these rope layers, we can still resize them back to their original size without loosing quality of the image, so we’re going to use that in our advantage now. Instead of placing the rope stock again in our image, select the first rope layer (above the planet layer) and make 4 more copies of it (Ctrl/Cmd+J, or drag them to the New Layer button).
Select the four new ropes we just created (click on the first one, hold shift and click on the last one) and drag them below our planet layer, like this:
Now we’re going to repeat the exact same process we used to match the ropes to the corners of the cube before, but this time it will be easier because the rope will be smaller already. So just start selecting each rope layer and chose one of the corners of the bottom of the cube to match it with. Here’s how I did mine:
Remember to hide the planet again to do the corners in the back.
And here is the result:
Now we’re going to do the same thing we did before one last time, to build the top part of our cube. Select the first rope layer and make 4 copies of it (Ctrl/Cmd+J or drag it to the New Layer button).
And use the Free Transform Tool again to build the top and last part of our cube.
Create a Surreal Photo Manipulation of a Monk in the Caves
Create this surreal scene of a monk and a floating sphere. This tutorial will teach you how to create a cave by transforming and merging different rock parts, easily create ropes in the form of a 3D cube using a 3D cube image as a reference, and creating a mountain scene peaking above the breathtaking clouds.
Create a new photoshop file using the settings indicated in the picture below. I named my file “Surreal Manipulation Tutorial” but that’s up to you.
Step 2: Adding the clouds and the sky
Let’s start off adding the sky to our manipulation. Go to File – > Place, and choose the “Sky2” image, mentioned in the resources of this tutorial.
If everything went well, this is what you should see in your screen:
Now click anywhere in the image, hold the Shift key (so it will translate only in one axis at the time) and drag it a little bit down.
To confirm the changes just hit Enter, or click in that little check sign on the top bar:
Now repeat the process to our second cloud stock (I called it Sky on the resources list). Place the image(File->Place) and drag it down while holding the Shift key again.
This is how your layers panel should be looking like so far:
Let’s add one more image before we start the manipulation. Place the “Field” image (File -> Place) and drag it past the top part of our canvas.
And here’s the four layers we should have so far:
Maybe you don’t have the Background layer, but if you do, you can delete it now because we won’t be using it. Just click it and drag it to the rubbish bin.
Now place the last image we added (the Field) behind our cloud layers. Just click and drag it to the end of our layers panel.
While we’re at it, let’s also rename all the layers so far so we don’t get lost in the manipulation process. Double click the name of a layer to change it.
By the end of this step, this is what your canvas should be looking like:
Step 3: Adjusting the clouds and the sky
It’s looking pretty bad so far, right? But don’t worry, we’ll fix that. Create a layer mask in the “Cloud 2” layer by clicking in the button that looks like a camera on the layers panel.
Now get the Brush Tool (Shortcut: B), right click anywhere inside the canvas and select a soft round brush (Hardness:0%). Make sure the opacity of your brush is at 100% (just below the Window menu button on the top bar).
Don’t worry about the size of the brush, but remember this shortcuts:
· To increase the size of a brush hit ]
· To decrease the size of a brush hit [
We’re going to be painting with black (to hide unwanted parts of our image non-destructively). To quickly get black as your foreground color just hit “D” on the keyboard.
When painting a layer mask, you can hold Alt/Opt and click it to see exactly what you’ve painted. What you should aim for in this step is to hide the corners of the image, the sky part of the clouds, and blend the clouds of this layer with the clouds of the layer below. To do this last step (the blending of clouds), you can lower the opacity of your brush to something around 10~25%. Here is what my layer mask looks like if I click it while holding Alt/Opt.
And here is the result of this layer mask:
Now we’re going to do the same thing with the other clouds layer (Cloud 1), but this time we are only going to erase the sky part of the layer. So repeat the same steps, create a new layer mask, and paint the sky part with black to hide it.
Here is the result:
Now let’s improve our sky a little bit. Select the Sky layer (from the Field stock), and add a Black & White filter. You can do that by clicking in the circle button in the layers panel:
Now select the Green Filter from the presets and clip this adjustment to the layer below (good photoshop practice). You can do that by clicking in the first button in the Properties window of this adjustment (the button with a square and an arrow next to it). Also, bring the opacity of this layer to 80%, and the Fill to 75%.
The second adjustment we will add to that layer is a Curves adjustment layer. Click in the same button you clicked before, but choose Curves this time.
With the RGB curve selected (default), add two points to it and change its shape to something like mine in the image below. Remember to clip this adjustment to the layer below as well (by clicking in the same button we did before).
Here is the result, and how your layers should look like so far:
To finish our sky, let’s add a layer to correct the lighting of it. Press Ctrl/Cmd+Shift+N and chose the following settings for this new layer:
Now grab the Dodge Tool (Shortcut: O). Make sure the range is set to Midtones, and the Exposure is around 10%.
With the Lighting layer selected, start paining the areas of the sky that should be lighter. To paint the darker areas we need to use the Burn Tool, which can easily be accessed by holding Alt/Opt while you’re painting. This also works the other way around, if you have the Burn Tool selected and hold Alt/Opt you’ll start using the Dodge Tool.
Try to create a good contrast between the dark and light areas, cause that’s what’s going to make this adjustment looks good, don’t be afraid to zoom in in some areas to do some details. Here is what my Lighting layer looks like in normal mode:
And here is the result of it:
Let’s clean our workspace a little bit. Select all the layers we created so far by clicking in the first one, holding Shift, and then clicking on the last one. Then, drag all of them to that little folder in the layers panel, which will create a new group with all of them. You could also select them and use the shortcut Ctrl/Cmd+G. Name this new group Sky/Clouds.
Step 4:Adding the Cave
Before we start creating the cave, let’s paint the area where we want it to be. Create a new layer by clicking in the sixth button in the layers panel, and name it Cave.
Now get the Brush Tool (Shortcut:B), select a soft brush (Hardness 0%), and keep the size around 500px. Now select the black color (Shortcut D) and start painting the contour of the cave around our image. Remember that you don’t have to create a cave exactly like mine, use your creativity!
We are not going to place the image of the cave straight into our canvas, we only need small pieces of the stock image (Little Island) to create our cave, so we’re only going to open it. Go to File -> Open to open the stock in another tab.
Now select the Pen Tool (Shortcut: P) and make a random selection in a random part of the island. Then, right click it and select Make Selection. Leave the Feather Radius at 0px. Here’s one example:
Now hit Ctrl/Cmd+C to copy it, go back to our project, and hit Ctrl/Cmd+V to paste it. Make sure that you’re pasting it above all the other layers.
We’re going to build our cave using these small pieces of the island stock. The first thing you should do after placing a new piece in the project is to drag it to the right place with the Move Tool (Shortcut:V) and create a layer mask for it (we did that a couple of times already).
After that, select the Brush Tool (Shortcut:B), and use black to hide some parts of the piece that you just added. Remember to change the opacity of the brush when painting different parts of this rock, just like that:
Here is the result of the first piece that we added:
We’re going to repeat this process until the cave is complete (I know, it will be a little tedious but bear with me here). So go back to the island stock tab, use the Pen Tool to select another part of it.
Then copy and paste this other piece into our project. If you’re not happy with the piece that you selected, you can try to modify it with the Free Transform Tool. Hit Ctrl/Cmd+T (or go to Edit - > Free Transform) to use the Free Transform Tool. Once you’ve done that, you can use it to rotate, resize or move your image.
· To move the image, just click anywhere inside the rectangle and drag it someplace else
· To rotate the image, click anywhere outside the rectangle and drag it around the image
· To resize the image, click in one of the corners of the rectangle and drag it. To maintain the proportion while doing this, just hold the Shift key during this process.
After some resizing, rotating, and the creation of a layer mask, here’s he result of my second piece of the cave.
Few tips about this process:
· You can use one piece more than one time if you want to, just duplicate it and it will be like a new piece. To duplicate a layer you can: use the shortcut Ctrl/Cmd+J; drag the layer to the sixth button of the layers panel; go to Layer -> Duplicate layer.
· To do the left side of the cave you’ll probably need to flip some of the pieces horizontally. To do that, go to Edit -> Transform -> Flip Horizontal.
· This process will be tedious but if you stick with it the results will make your image unique.
· Try to leave a flat piece of the cave on the right corner so we can add the monk to it later.
· Don’t try to do everything at once, choose a lot of small pieces over a few large ones.
· Put a good song on and have fun with it! =D
In the end here’s how my cave tuned out:
And here is all the layers I used:
To clean that mess we’re going to create a new group with all of them, just like we did before. Select all of them and drag them to the folder button in the layer panels (or hit Ctrl/Cmd+G). Name this new group “Cave Walls” or something, and create a new layer mask to it.
With this mask we’re going to erase some parts of the cave. To do that, use the image below as reference and paint the red areas with black (remember to use a soft brush and keep the opacity around 10~25%).
Here’s how my cave is looking like after that:
As a final adjustment to the cave, add a new layer (CtrlCmd+Shift+N) and let’s do the lighting of it just like we did with the clouds and the sky.
Select the Dodge Tool (Shortcut: O) and try to highlight the areas of the cave that are exposed to the sun, and darken the other areas to create a fade-away effect. Remember to also add some details (highlights close to darken areas) to give a good contrast to it. Here’s how my layer looks like in normal mode:
And here is the result of it:
To finish this step, select the “Cave Walls” group and reduce the opacity to around 85~90%.
Step 5: Adding the monk
Place the monk stock into our image by going to File -> Place. Make sure you place it above all the other layers.
We’re going to select the monk using the Pen Tool. Select it (Shortcut P) and create a path around the monk. Then right click in it and select Make Selection. Usually when you use the pen tool to create a selection you wouldn’t need to add any feather to it, but if you want to add feather don’t go over 1px.
With the monk selected, create a new layer mask to its layer to make everything else disappear.
Hit Ctrl/Cmd+T (or go to Edit -> Free Transform) to resize the monk and place it on the left corner of the cave.
We’re going to use the same technique we’ve been using so far to add lighting to the monk. Hit Ctrl/Cmd+Shift+N to create a new layer with these settings:
Grab the Dodge Tool (Shortcut O) and make sure the range is at Midtones and the Exposure around 25%.
Create the lighting of the monk trying to give the impression that the sun is in front of him. Here’s what I did:
And here is the result:
Create a new layer between the monk layer and the Cave Lighting layer. Name this layer “Monk Shadow”.
Clip this layer to the Cave Walls group by holding Alt/Opt and clicking between the Monk Shadow and the Cave Lighting layer.
Now using a soft brush (Shortcut B), paint the shadow of the monk in the cave using pure black. Don’t worry about going over the sky or the monk because the shadow will only affect the cave layer. Try to do something like this:
To improve the shadow, go to Filter -> Blur -> Gaussian Blur and select a radius of 12px.
Let’s add more shadow above the monk layer. Create a new layer using the same process, name it Monk Shadow again, but this time place it above all the other layers. Also, clip this layer to the Monk Lighting layer.
With the same brush we used before, paint some black in the robes of the monk. Use a soft brush with the opacity set to something around 10~25%.
Here is the final result of this step:
Step 6: Adding the mountains
Place the mountains in our project by going to File -> Place and selecting them.
Add a layer mask to this layer and use black to hide the sky of this image (remember to use a soft brush at least around the peaks of the mountains).
Press Ctrl/Cmd+T (or Edit -> Free Transform) and resize the mountains to make them smaller.
Here is what you should be aiming for:
Now place the mountains between the Cave layer and the Sky/Clouds group.
Select the layer mask of the mountains layer (the one we created before) and keep painting it with black. This time we’re aiming to hide the base of the mountains. Try to give the impression that the clouds are covering some parts of the mountain (set the opacity around 15% when painting these areas).
Rename the mountains layer to “Mountains”(really original huh).
And here is the result of adding the mountains to our scene:
Step 7: Few adjustments
Before we continue, let’s do some adjustments to our workspace. First, select the monk layer and the two layers above it and make a new group with them.
Then open the Sky/Clouds group and drag the Mountains layer inside it. Make sure that it is the top layer inside the group.
Now rename this group to Sky/Clouds/Mountains so we don’t get lost later.
There’s a weird spot close to our cave where the clouds are really white, let’s fix that now. Double click the Cloud 2 layer to make changes to that smart object.
Now select the Clone Stamp Tool (Shortcut S) and follow the instructions on the image below:
· To clone parts of an image hold Alt/Opt and left click in the area you want to use
· To paste the areas you cloned into new areas simply let go of Alt/Opt and left click in the new area
Here is the result:
And here is what our image should be looking like without that weird bright cloud in the corner:
Last but not least, rename the group we created in the beginning of this step to Monk.
Step 8: Adding the planet
Go to File -> Place and select the planet stock.
Now select the Eliptical Marquee Tool (Shortcut M) and create a perfect circle in the planet that it’s on the front. To create a perfect circle simply hold Shift while creating the ellipse.
Then create a new layer mask in this layer to hide everything else but the planet.
Hit Ctrl/Cmd+T (or Edit->Free Transform) to resize and replace the planet in our image.
Now double click the planet layer (double click somewhere around the name of the layer). Add a Inner Glow style to this layer, with the following settings:
Here is the result in our planet:
And this is how your layers panel should be looking like:
Step 9: Adding some ropes
In this step we’re going to add the ropes that will surround our planet in the shape of a 3D cube. Before we start adding the ropes, we need to add the shape of a 3D cube so we can work around it.
Open the 3D cube psd file in photoshop, and select the “spine highlights” group. With this group selected, hit Ctrl/Cmd+Alt/Opt+Shift+E to create a new layer in the file with all the previous layers merged. This is what your layers panel should be looking like:
Now hit Ctrl/Cmd+A to select everything, and then Ctrl/Cmd+C to copy the cube. Go back to our project, and hit Ctrl/Cmd+V to paste the cube that we just copied. You can close the cube psd if you want to, we’re not going to use that anymore.
Make sure the cube layer is right below the layer of the planet.
Press Ctrl+T to go into Free Transform Mode (or Edit -> Free Transform), and use it to resize and move the cube into this position:
Now let’s start adding the ropes. Go to File -> Place and add the rope stock into our project.
Don’t worry about the order of the layers now. Just drag the rope layer 4 times into the Create New Layer button to make 4 copies of it. (or use the shortcut Ctrl/Cmd+J 4 times).
After that, we’re going to place one of the rope layers above the Planet layer, and the three others below it, like this:
Select the second rope layer (the one right below the planet layer) and let’s use it to start our manipulation. Hit Ctrl/Cmd+T (Edit-> Free Transform) and use the Free Transform Tool to resize, move and rotate the rope. The aim of this process is to try to create a cube made of ropes, so each rope will go into one corner of the cube. We’re going to do the top and the bottom part of the cube later, so start by adjusting the first rope to the right corner of the cube.
Do the same thing for the next rope, use the Free Transform Tool again, but this time match the rope with the left side of the cube.
The third and last rope layer below the planet will go on the corner behind the planet, so before you start using the Free Transform Tool, click on the eye on the left side of the planet layer to hide it.
Now select the rope above the planet layer and match it to the corner in the front using the Free Transform Tool.
And this is what your scene should be looking like right now:
The best thing about working with Smart Objects is that even though we just resized all these rope layers, we can still resize them back to their original size without loosing quality of the image, so we’re going to use that in our advantage now. Instead of placing the rope stock again in our image, select the first rope layer (above the planet layer) and make 4 more copies of it (Ctrl/Cmd+J, or drag them to the New Layer button).
Select the four new ropes we just created (click on the first one, hold shift and click on the last one) and drag them below our planet layer, like this:
Now we’re going to repeat the exact same process we used to match the ropes to the corners of the cube before, but this time it will be easier because the rope will be smaller already. So just start selecting each rope layer and chose one of the corners of the bottom of the cube to match it with. Here’s how I did mine:
Remember to hide the planet again to do the corners in the back.
And here is the result:
Now we’re going to do the same thing we did before one last time, to build the top part of our cube. Select the first rope layer and make 4 copies of it (Ctrl/Cmd+J or drag it to the New Layer button).
And use the Free Transform Tool again to build the top and last part of our cube.
Now we have a lot of layers and our project is all messy, but don’t worry, we’ll fix that.
Select all the ropes above the planet layer (Click on the first one, hold Shift and then click on the last one) and drag them to the New Group button (or Ctrl/Cmd+G) to create a new group with them. Name this new group “Ropes in front”.
Do the same thing for the ropes below the planet, but this time name this group “Ropes in the back”.
You can also delete the 3d cube stock we used to build our rope cube because we won’t be needing it anymore. Just click on its layer and drag it to the trash can on the layers panel.
By the end of this step, here’s how your image should be looking like:
And this is how your layers panel should be looking like:
Step 10: Adding more ropes
Ok, so in this step we’re going to continue adding ropes to our project (it will be the last time I promiss). Go to File -> Place and select the rope stock again.
Make 4 copies of this rope layer (Ctrl/Cmd+J or drag it to the New Layer button).
Select all of this ropes by clicking on the first one, holding Shift and clicking on the last one, and create a new group with them (Shortcut: Ctrl/Cmd+G).
Name this new group “Ropes holding the cube” and place it between the Cave layer and the Sky/Clouds/Mountains group.
Open the group that we just created by clicking on the arrow next to it. Then click on the first layer of the group and use the Free Transform Tool (Ctrl/Cmd+T or Edit->Free Transform) to resize, move and rotate the rope.
You don’t have to create a design just like mine if you don’t want to, you can use your imagination. But if you want to put the ropes in the exact same places I did, here’s my step-by-step:
And here’s how my scene turned out in the end:
And how my layers panel is right now:
Step 11: Adding the knots
Let’s put some details into our ropes. Go to File->Place and select the knot stock.
Now get the Quick Selection Tool (Shortcut:W) and try to make a selection around the knot only. Don’t worry if the selection is not perfect, it doesn’t need to be, you can fix it later. Here are some pointers on the Quick Selection Tool:
· Click somewhere in the image to add to the selction
· Hold Alt/Opt and click somewhere in the image to deselect that area
After you made the selection, create a new Layer Mask to that layer by clicking on the third button of the layers panel:
With the knot selected, use the Free Transform Tool Again (Ctrl/Cmd+T or Edit-> Free Transform) to move, resize and rotate the knot to one of the corners of the cube:
Here’s how it looks from distance:
Now repeat that process that we’re used with, make 6 copies of this know layer (one for each visible corner of the cube) by dragging this layer to the New Layer button or by pressing Ctrl/Cmd+J six times.
Using the Free Transform Tool (Ctrl/Cmd+T or Edit-> Free Transform) on each of these knot layers, resize, move and rotate them into each corner of the cube, like we’re used to do.
After that, create a new group with all of these knots (holding Shift to select them all and dragging them to the New Group button or by hitting Ctrl/Cmd+G), and name this group Knots.
And we’re done with this step! This is what your image should be looking like right now:
Step 12: More adjustments to the ropes
Let’s add some adjustments to all the ropes that we created. First, click on the Knots group and drag it to the “Ropes in front” group. Just make sure that the knots group stays on the top of the “Ropes in front” group.
Now let’s add a Curves adjustment layer. Click on the “Create a new fill or adjustment layer” button on the layers panel and select Curves.
Make sure that the curves adjustment layer is above the “Ropes in front” group.
Now remember to clip this adjustment to the group below by clicking on the first button of the Curves properties panel, and then adjust the RGB curve of our adjustment to something like this:
And this is the result:
Now we’re going to copy it two more times like we always do. Select it and drag it to the New Layer buton (or hit Ctrl/Cmd+J).
Take a look at the image below and drag each of these adjustments above one of the other two ropes group.
Remember to click each one of them to the group below by holding Alt/Opt and clicking on the line between the adjustment and the group below.
This is the result we were hoping for:
Step 13: Cleaning our project
We’re entering the final stage of our project now but our layers are sill a little messy, let’s try to clean them now.
Select the first Curves adjustment layer and the “Ropes in front” group and create a new group with them (Shortcut: Ctrl/Cmd+G). Name this new group “Ropes”.
Now select the second Curves adjustment layer and the “Ropes in the back” group and make a new group with them the same way we just did (Shortcut Ctrl/Cmd+G). Name this group “Ropes” again.
Again, select the last Curves Adjustment Layer and the “Ropes holding the cube” group and create a third group named “Ropes”. (Shortcut: Ctrl/Cmd+G)
Now select the Monk Shadow layer, the Cave Lighting, the Cave Walls group and the Cave layer and create another group with all of them. (Shortcut Ctrl/Cmd+G). Name this group “Cave/Monk Shadow”.
And as expected, our image should still be like this:
With the brush tool (Shortcut: B) selected, set the size of the brush to around 300px, the mode to Normal and reduce the opacity to something around 50%. Also, make sure you have black as your foreground color (Shortcut to reset the colors of your palete: D).
Now paint the area inside the cube, the spaces between the ropes holding the cube, and part of the cave in that space as well. Here’s how my layer looked like in normal view:
And here’s the result of it:
Now create a new layer the same way we did before, click on the Create New Layer button (Shortcut: Ctrl/Cmd+Shift+N), reduce the opacity to 8%, change the blending mode to Color, name it Purple, and place it right above the Black layer we just created.
Now, as you guessed, we’re going to use purple to paint our scene. I used #8400ff but you can use something similar if you want to.
Using the same brush settings as before, take a look at the image below and paint our cube with purple:
Here’s the result:
Step 15: Final Adjustments
Ok, this is the last step of our manipulation. We’ll add a bunch of adjustments to change the colors of our image and give it a dreamy look in the end.
First create a Black & White adjustment layer:
And on the properties panel, select the “High Contrast Red Filter” preset.
Then change the opacity of this layer to 27% and this should be the result:
Create a new layer by clicking on the Create New Layer button (Ctrl/Cmd+Shift+N) and name this layer Gradient. Set the blending mode to Soft Light and the opacity to 35%.
Now get the Gradient Tool (Shortcut G) and go to the Gradient Editor.
On the Gradient Editor window, create a new gradient going from a blue color to a yellow color. Try to use colors that are similar to these:
With the gradient we just created, follow the image below to create a gradient in our image. Remember that you won’t see the gradient like in the image below, but I just wanted to show you what it looks like in Normal view.
This is the result of the gradient:
Now add a Brightness/Contrast adjustment above all the other layers and set the Brightness to 20.
This is the result:
Add a Selective Color adjustment layer so we can adjust all the colors of our image at once. On the properties panel, use the following settings in each of the Colors:
The result should be something like this:
Let’s create a new layer with all of our previous layers merged. To do that, hit Ctrl/Cmd+Alt/Opt+Shift+E. Set the blending mode of this layer to Screen, and reduce the opacity to 15%.
Now with this layer selected, go to Filter->Blur->Gaussian Blur and select a Radius of 80px.
The result should be this dreamy effect:
Duplicate the layer we just created by dragging it to the Create New Layer button or by pressing Ctrl/Cmd+J. Set the blending mode of this new layer to Soft Light and set the opacity to 25%.
Here’s the result:
Now create a new layer by pressing the Create New Layer button (or Ctrl/Cmd+Shift+N) and name it Vignette. Place it above all the other layers.
Press D to make sure that black is your foreground color, and then hit Alt/Opt+Del to fill your whole screen with black.
Get the Eraser Tool (Shortcut E), set the size to 2000px, and start erasing the center of our image to create a nice vignette effect to it.
Here’s how your layers should be looking like:
Create a new layer again (Ctrl/Cmd+Shift+N), name it Lens Flare, set the blending mode to Screen and make sure that it is on the top of the layer stack.
Now go to Filter -> Render -> Lens Flare and try to create something like shown on the image below. Remember to select Movie Prime and set the Brightness to 100%.
This should be the result:
Now add a layer mask to that image and hide some of the Lens Flare using the Brush Tool (Shortcut B) with black.
This is the result:
Now for the textures, go to File -> Place and chose Texture 1. Set the blending mode to Overlay and the Opacity to 25%.
This is the result we get:
And for the second and final texture, go again to File -> Place and chose Texture 2. Rotate it (just like when using the Free Transform Tool) and resize it to fit our whole canvas.
Then change the blending mode of this layer to Soft Light and reduce the opacity to 20%.
And this is our final result, and the end of our image:
Remember to select all the adjustments we just added (holding Shift) and create a new group with them. Name this group “Final Adjustments” and we’re done!
Final Results
Download the PSD
Surreal Manipulation Tutorial.zip | 106 MB
About the Author
Now we have a lot of layers and our project is all messy, but don’t worry, we’ll fix that.
Select all the ropes above the planet layer (Click on the first one, hold Shift and then click on the last one) and drag them to the New Group button (or Ctrl/Cmd+G) to create a new group with them. Name this new group “Ropes in front”.
Do the same thing for the ropes below the planet, but this time name this group “Ropes in the back”.
You can also delete the 3d cube stock we used to build our rope cube because we won’t be needing it anymore. Just click on its layer and drag it to the trash can on the layers panel.
By the end of this step, here’s how your image should be looking like:
And this is how your layers panel should be looking like:
Step 10: Adding more ropes
Ok, so in this step we’re going to continue adding ropes to our project (it will be the last time I promiss). Go to File -> Place and select the rope stock again.
Make 4 copies of this rope layer (Ctrl/Cmd+J or drag it to the New Layer button).
Select all of this ropes by clicking on the first one, holding Shift and clicking on the last one, and create a new group with them (Shortcut: Ctrl/Cmd+G).
Name this new group “Ropes holding the cube” and place it between the Cave layer and the Sky/Clouds/Mountains group.
Open the group that we just created by clicking on the arrow next to it. Then click on the first layer of the group and use the Free Transform Tool (Ctrl/Cmd+T or Edit->Free Transform) to resize, move and rotate the rope.
You don’t have to create a design just like mine if you don’t want to, you can use your imagination. But if you want to put the ropes in the exact same places I did, here’s my step-by-step:
And here’s how my scene turned out in the end:
And how my layers panel is right now:
Step 11: Adding the knots
Let’s put some details into our ropes. Go to File->Place and select the knot stock.
Now get the Quick Selection Tool (Shortcut:W) and try to make a selection around the knot only. Don’t worry if the selection is not perfect, it doesn’t need to be, you can fix it later. Here are some pointers on the Quick Selection Tool:
· Click somewhere in the image to add to the selction
· Hold Alt/Opt and click somewhere in the image to deselect that area
After you made the selection, create a new Layer Mask to that layer by clicking on the third button of the layers panel:
With the knot selected, use the Free Transform Tool Again (Ctrl/Cmd+T or Edit-> Free Transform) to move, resize and rotate the knot to one of the corners of the cube:
Here’s how it looks from distance:
Now repeat that process that we’re used with, make 6 copies of this know layer (one for each visible corner of the cube) by dragging this layer to the New Layer button or by pressing Ctrl/Cmd+J six times.
Using the Free Transform Tool (Ctrl/Cmd+T or Edit-> Free Transform) on each of these knot layers, resize, move and rotate them into each corner of the cube, like we’re used to do.
After that, create a new group with all of these knots (holding Shift to select them all and dragging them to the New Group button or by hitting Ctrl/Cmd+G), and name this group Knots.
And we’re done with this step! This is what your image should be looking like right now:
Step 12: More adjustments to the ropes
Let’s add some adjustments to all the ropes that we created. First, click on the Knots group and drag it to the “Ropes in front” group. Just make sure that the knots group stays on the top of the “Ropes in front” group.
Now let’s add a Curves adjustment layer. Click on the “Create a new fill or adjustment layer” button on the layers panel and select Curves.
Make sure that the curves adjustment layer is above the “Ropes in front” group.
Now remember to clip this adjustment to the group below by clicking on the first button of the Curves properties panel, and then adjust the RGB curve of our adjustment to something like this:
And this is the result:
Now we’re going to copy it two more times like we always do. Select it and drag it to the New Layer buton (or hit Ctrl/Cmd+J).
Take a look at the image below and drag each of these adjustments above one of the other two ropes group.
Remember to click each one of them to the group below by holding Alt/Opt and clicking on the line between the adjustment and the group below.
This is the result we were hoping for:
Step 13: Cleaning our project
We’re entering the final stage of our project now but our layers are sill a little messy, let’s try to clean them now.
Select the first Curves adjustment layer and the “Ropes in front” group and create a new group with them (Shortcut: Ctrl/Cmd+G). Name this new group “Ropes”.
Now select the second Curves adjustment layer and the “Ropes in the back” group and make a new group with them the same way we just did (Shortcut Ctrl/Cmd+G). Name this group “Ropes” again.
Again, select the last Curves Adjustment Layer and the “Ropes holding the cube” group and create a third group named “Ropes”. (Shortcut: Ctrl/Cmd+G)
Now select the Monk Shadow layer, the Cave Lighting, the Cave Walls group and the Cave layer and create another group with all of them. (Shortcut Ctrl/Cmd+G). Name this group “Cave/Monk Shadow”.
And as expected, our image should still be like this:
With the brush tool (Shortcut: B) selected, set the size of the brush to around 300px, the mode to Normal and reduce the opacity to something around 50%. Also, make sure you have black as your foreground color (Shortcut to reset the colors of your palete: D).
Now paint the area inside the cube, the spaces between the ropes holding the cube, and part of the cave in that space as well. Here’s how my layer looked like in normal view:
And here’s the result of it:
Now create a new layer the same way we did before, click on the Create New Layer button (Shortcut: Ctrl/Cmd+Shift+N), reduce the opacity to 8%, change the blending mode to Color, name it Purple, and place it right above the Black layer we just created.
Now, as you guessed, we’re going to use purple to paint our scene. I used #8400ff but you can use something similar if you want to.
Using the same brush settings as before, take a look at the image below and paint our cube with purple:
Here’s the result:
Step 15: Final Adjustments
Ok, this is the last step of our manipulation. We’ll add a bunch of adjustments to change the colors of our image and give it a dreamy look in the end.
First create a Black & White adjustment layer:
And on the properties panel, select the “High Contrast Red Filter” preset.
Then change the opacity of this layer to 27% and this should be the result:
Create a new layer by clicking on the Create New Layer button (Ctrl/Cmd+Shift+N) and name this layer Gradient. Set the blending mode to Soft Light and the opacity to 35%.
Now get the Gradient Tool (Shortcut G) and go to the Gradient Editor.
On the Gradient Editor window, create a new gradient going from a blue color to a yellow color. Try to use colors that are similar to these:
With the gradient we just created, follow the image below to create a gradient in our image. Remember that you won’t see the gradient like in the image below, but I just wanted to show you what it looks like in Normal view.
This is the result of the gradient:
Now add a Brightness/Contrast adjustment above all the other layers and set the Brightness to 20.
This is the result:
Add a Selective Color adjustment layer so we can adjust all the colors of our image at once. On the properties panel, use the following settings in each of the Colors:
The result should be something like this:
Let’s create a new layer with all of our previous layers merged. To do that, hit Ctrl/Cmd+Alt/Opt+Shift+E. Set the blending mode of this layer to Screen, and reduce the opacity to 15%.
Now with this layer selected, go to Filter->Blur->Gaussian Blur and select a Radius of 80px.
The result should be this dreamy effect:
Duplicate the layer we just created by dragging it to the Create New Layer button or by pressing Ctrl/Cmd+J. Set the blending mode of this new layer to Soft Light and set the opacity to 25%.
Here’s the result:
Now create a new layer by pressing the Create New Layer button (or Ctrl/Cmd+Shift+N) and name it Vignette. Place it above all the other layers.
Press D to make sure that black is your foreground color, and then hit Alt/Opt+Del to fill your whole screen with black.
Get the Eraser Tool (Shortcut E), set the size to 2000px, and start erasing the center of our image to create a nice vignette effect to it.
Here’s how your layers should be looking like:
Create a new layer again (Ctrl/Cmd+Shift+N), name it Lens Flare, set the blending mode to Screen and make sure that it is on the top of the layer stack.
Now go to Filter -> Render -> Lens Flare and try to create something like shown on the image below. Remember to select Movie Prime and set the Brightness to 100%.
This should be the result:
Now add a layer mask to that image and hide some of the Lens Flare using the Brush Tool (Shortcut B) with black.
This is the result:
Now for the textures, go to File -> Place and chose Texture 1. Set the blending mode to Overlay and the Opacity to 25%.
This is the result we get:
And for the second and final texture, go again to File -> Place and chose Texture 2. Rotate it (just like when using the Free Transform Tool) and resize it to fit our whole canvas.
Then change the blending mode of this layer to Soft Light and reduce the opacity to 20%.
And this is our final result, and the end of our image:
Remember to select all the adjustments we just added (holding Shift) and create a new group with them. Name this group “Final Adjustments” and we’re done!
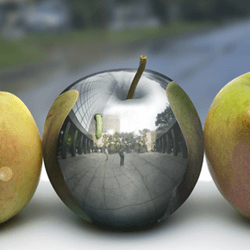


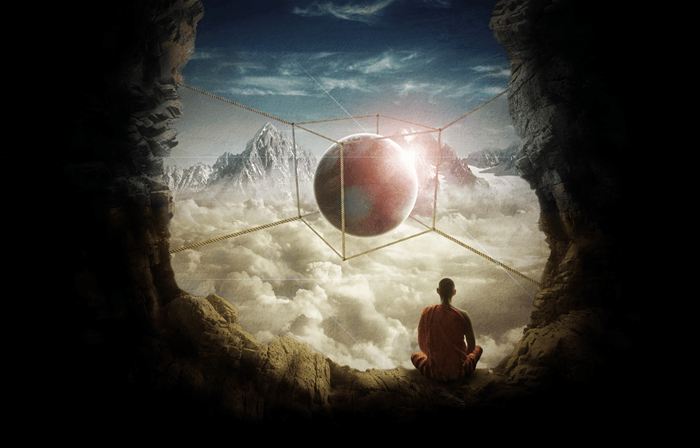


![image002[1]](http://photoshoptutorials.ws/wp-content/uploads/2013/07/image0021.png "image002[1]")


![image002[2]](http://photoshoptutorials.ws/wp-content/uploads/2013/07/image0022.png "image002[2]")
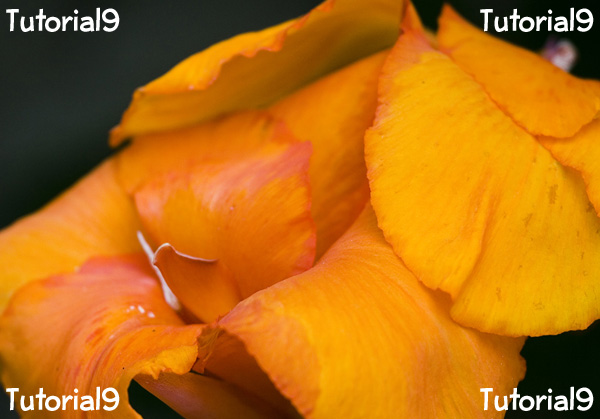
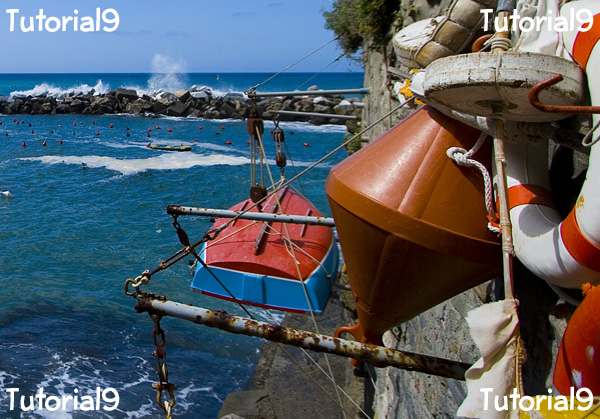